

Maintaining Your School Garden
The excitement of Planting Day is hard to top, but it is the continual care and observation of plant growth that strengthens students’ connection to the land and broadens their understanding of the environment and food systems. Once plants are in the ground, you will need to maintain the garden through regular activities such as watering, thinning, weeding, fertilizing, mulching, composting, and monitoring for pests. These activities promote healthy plants by providing for their needs. The five basic needs of plants are water, light, nutrients, air, and a place to grow.
Water. Plants use water for a number of important processes, including photosynthesis (production of food) and transpiration (evaporation of water from the leaves into air that cools the plant and creates pressure to move water from roots to leaves). Water also aids in the absorption of some nutrients.
Light. Energy from light is captured to use during photosynthesis.
Nutrients. Just as people need vitamins, plants need special nutrients to help them grow properly and for their biological processes to function. The top three essential nutrients for plants are nitrogen, phosphorus, and potassium. Most plant nutrients are provided by the soil, and we increase their availability through fertilization.
Air. Plants take in carbon dioxide for photosynthesis and oxygen for respiration.
A Place to Grow. Plants need a place to call their own with room to grow to maturity.
The need for each of these components varies by plant. Research your school garden plants to learn how to care for them properly. Plants also provide signals when they have a need. For instance, a plant needing water will wilt, and the leaves of a plant needing nitrogen will turn yellow. It is important for your students to discover and understand these signals.
This chapter provides background information on some of the techniques your team will employ to maintain the garden, along with an overview of seasonal garden tasks. It concludes with tips for dealing with such common challenges as how to maintain the garden during summer breaks and how to deal with vandalism.
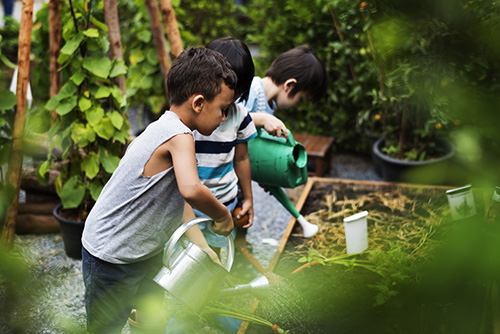
Watering
As a general rule, during active growth most plants require about 1 inch of water (from rain or irrigation) per week. In hot, dry, and windy conditions they need more. In cool and humid conditions they need less. Feeling the soil around the plants is the best indicator of when it is time to water. The soil should be moist, but not too wet. Poke your finger about 1 inch down in the soil. If the soil feels dry, then it needs additional water.
Plants wilt when not enough water is getting to the leaves. However, do not automatically assume that you need to water wilted plants, because they may also wilt when there is ample or excessive water. Test the soil first. If the plants are wilted but the soil is wet, it is still a sign that the leaves are not getting enough water – but it is a root problem. If the plant is new or recently transplanted, it may just need some time for the root system to become established. Sometimes new roots cannot keep up with the water demands of the leaves. If the problem continues, it could mean the roots have a fungal disease. In this case, remove the plant and the soil around it to prevent possible disease spread.
When you or your students water, apply the spray to the base of the plant and avoid excessive moisture on the leaves. The plants are absorbing water through their roots, so the water needs to be in the soil. Additionally, water on leaves can lead to a number of disease problems. Water plants in the early morning to cut potential losses by evaporation. Apply water slowly to give it time to sink into the soil. If water is applied too quickly or with too much force, it will run off into drainage areas along with loose soil and new seeds. Children often water until the soil looks moist on the surface, but that might not be enough to benefit the plant. After watering, it is always a good idea to check the soil by poking a finger into the soil around the plant’s roots.
A number of watering tools are available. Watering cans and garden hoses are the least expensive alternatives. However, they take quite a bit of time and close monitoring. Other alternatives are soaker hoses, drip irrigation, and sprinkler systems. These require less time and can be linked to automatic timers, easing the chore of watering during weekends and long breaks. These tools are more expensive, however, so you may need to look for additional funds or donations.
Thinning
Many times more seeds are planted than can grow to maturity in the available space. Once the seeds germinate, you and your students need to “thin” your crop by removing some of the seedlings growing too close to each other. Although it is never easy to remove plants, if you leave too many plants in a small space they will compete for resources and will not be able to grow to their full potential.
When your students thin, instruct them to identify the healthiest seedlings and remove the others. One technique is to pull out the less-healthy seedlings. However, doing so risks disturbing the roots of the plants you want to keep. An alternative is to cut the tops off the unwanted seedlings, after which the roots will eventually decompose. Thinning can be a challenging activity for younger children, and they may need close guidance.
You can place thinned plants in a compost pile or worm bin. Also, some vegetable sprouts are edible and full of nutrients—perfect for a great nutrition lesson and tasting activity.
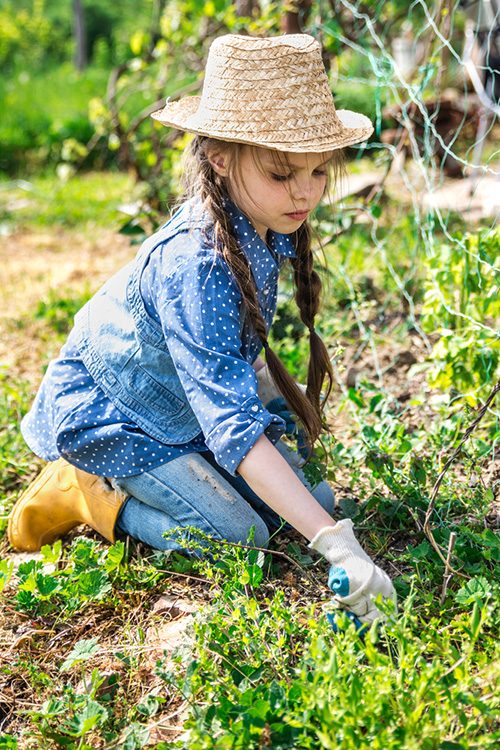
Weeding
Weeds are plants growing in the wrong place. You should remove all such plants because they will compete for space, light, and water with your intended crops (and many times weeds will win, because they are well adapted to your conditions). First, you and your students need to learn how to identify the seedlings of your crops. After students know what to keep, they will know what to remove. Pull weeds by hand or remove them by hoeing or cultivating around the plants, staying far enough away to prevent damaging the wanted plants or their roots. With either approach, make sure the roots of the weed are completely removed.
To ensure that weeding does not become an overwhelming job, encourage students to monitor the garden continuously and remove weeds when they are small. If weeds are allowed to grow for too long, they will flower and spread seeds, which will escalate the weed problem. One simple way to decrease weed problems is to apply a layer of mulch to the soil.
Mulching
Outdoor gardens benefit from the addition of two to three inches of mulch on top of the soil. The mulch helps to slow water loss from evaporation, moderate soil temperatures, decrease soil erosion, and decrease the spread of soil-borne diseases. You can use a number of different materials as mulch, including shredded wood, leaves, straw, plastic, and newspaper. The various mulches offer different benefits. For instance, organic mulches (shredded wood, leaves, or straw) will eventually break down and help improve soil structure. Plastic mulches will increase the soil temperature. Choose mulch according to your plants’ needs, mulch availability, and visual preferences.
Fertilizing
For healthy growth, all plants require certain nutrients. The three they need in the largest quantities are nitrogen (N), phosphorus (P), and potassium (K). Nitrogen is important for stem and leaf growth and for the photosynthesis process. Phosphorus promotes root growth and improves flowering and fruiting. Potassium contributes to root development, the overall growth of the plant, and disease resistance. Other essential nutrients are equally important, but plants require them in much smaller amounts.
Plants acquire most nutrients from the soil by absorbing them through their roots. During the site analysis discussed in Chapter 5, Designing Your School Garden, you completed a soil test that provided information on the nutrient content. It is common to find that your soil is low in nutrients, especially the “big three.” Since nutrients aren’t always abundant enough in soil to support healthy plant growth, gardeners make up the difference by adding fertilizer.
A number of different types of fertilizers are available. Some deliver nutrients to your plant immediately; others release nutrients slowly over time. Examples of common fertilizers are liquid or solid synthetic fertilizers, slow-release pellets, compost, fish emulsion, and dried manure. Any product sold as a fertilizer will have a nutrient analysis on the label with three numbers. The numbers represent what percentage of the three major nutrients—nitrogen (first number), phosphorus (second number), and potassium (third number)—the fertilizer contains. The product label should also tell you how much to use for different crops and areas. Check with school administrators to see if there are any restrictions on the type of fertilizer your class may use in the garden. Always follow the warnings on fertilizer products and store in a secure location. Fertilizers should be handled by adults or under close adult supervision.
You might think that if a little bit of fertilizer will help your plant grow, a lot of fertilizer will result in an even better harvest. However, the phrase “the more the better” is not applicable to fertilization. Excessive fertilizer can contribute to plant diseases and lead to runoff of the extra nutrients. So make sure to apply only the amount you need.
Fertilizing is not a one-time event. As plants grow, they deplete the soil’s available nutrients, so you will need to constantly monitor nutrient levels and provide additional fertilizers when needed. Keeping soil healthy is the key to maintaining healthy and productive plants.
Composting
In the natural world, decomposers such as earthworms, sow bugs, slugs, molds, mushrooms, and bacteria use dead plants and animals as food, breaking them down into smaller particles and thereby releasing nutrients back into the soil. In the garden, we simulate this decomposition process by creating compost piles.
Compost piles are made up of garden waste and other organic matter high in carbon and nitrogen and exposed to moist conditions to attract decomposers. As the decomposers use the composted organic matter for energy and maintenance, they break it down into simpler molecules. This process gives off heat, which in turn speeds up decomposition. Compost can be made in freestanding piles (3- by 3- by 3-foot is an optimal size) or contained in special bins as long as it receives proper water and air movement.
Once the materials are broken down, the compost can be incorporated into the soil to increase the nutrient content and improve the structure. Check the Kentucky Ready Set Grow web site at www.kyreadysetgrow.org for more information on creating a compost pile, or contact your local Cooperative Extension Service office.
Monitoring for Pests
Your garden ecosystem is home to many insects and other organisms, and only a handful of them are actually harmful to plants. Even when plant pests are present, they are not necessarily a threat to the garden. Like healthy people, healthy plants are usually able to ward off some stress and handle minor damage while continuing to perform well.
In order to keep pest problems to a minimum, the best practice is to monitor the garden regularly. Insect and disease problems are easiest to fix if caught early. Check the plants for plant-eating insects like aphids and various beetles. If found early, their populations can be controlled through handpicking or using a high-pressure water spray. Also look out for leaf spots, which can be a sign of fungal or bacterial disease. Remove leaves with signs of disease so it does not spread through the bouncing of irrigation and rainwater. Place plants you suspect of being diseased in the trash rather than a compost pile.
When you find signs of pests, your first step should be to identify what is causing the problem. This can be an exciting investigative activity for your students. Once your sleuths identify the problem, you need to decide whether the damage is significant enough to warrant any action. Tolerate some plant damage. Observing the interactions in a garden ecosystem is an important part of the learning process for your students. Many plant pests have natural predators, and if you remove the pests, your students will never get to see the predators in action. For example, ladybugs are ferocious aphid consumers. However, if you don’t have any aphids, then you also won’t attract any ladybugs.
If the damage becomes more severe, decide whether or not the plants are worth keeping. Disease problems are often a sign that the plants are not well adapted to the environment, so pulling them up and replacing them with crops better suited to the location may be the easiest solution. If you feel that more control is necessary, such as the use of pesticides, check with school administrators and maintenance personnel. Schools have strict pest control regulations.
In addition to monitoring the plants and providing proper maintenance to promote good plant health, here are some additional techniques to minimize pest and disease buildup in the garden:
Practice crop rotation. Pests and diseases that affect certain crops (or families of crops) build up in the soil if the same crop is grown in a particular bed year after year. By planting a different crop in the bed each year on a three-year cycle, you can avoid many problems.
Discourage excess moisture on foliage. Most fungal and bacterial diseases can infect plant surfaces only if there is moisture present. In regions where the growing season is humid, provide adequate space among plants so that air can circulate freely. Try to keep students out of the garden when it’s wet so they don’t spread disease organisms.
Plant disease- and pest-resistant varieties. Some varieties of crops are naturally less susceptible to problems, and plant breeders have developed many others. Look for resistance information in variety descriptions in catalogs and on seed packets.
Plant appropriate varieties for your area. Many plants will not thrive if they are grown in the wrong climate zone.
Clean up your garden. Diseases and pests can remain on infected and dead plant material, making it easy for them to attack other plants. Remove infected plant leaves, keep weeds to a minimum, and clean up the garden at the end of the growing season.
Encourage beneficial organisms. Make the garden inviting to pest predators such as ladybugs, wasps, lacewings, and birds. Flowers and herbs provide nectar to predatory insects, and a water source such as a fountain or bath will attract birds. Growing perennial plants (those that last two or more seasons) helps to provide year-round habitats for beneficial organisms.
Install barriers. You can place floating row covers made of lightweight fabric over plants to protect them from invading pests. The fabric allows light, moisture, and air to pass through. However, if you cover a crop that requires insect pollination in order to bear fruit, you will have to remove the covers when the plants begin to blossom. Row covers may also deter some animal pests, but fences are often the only way to keep large, persistent creatures out of the garden. Use netting to protect fruit crops from hungry birds. A collar of newspaper, stiff paper, or boxboard circling seedling stalks and extending two inches above and below ground prevents cutworm damage.
Summer Maintenance
Maintaining a school garden during the summer amid vacation plans is a common challenge. You want to enjoy the break to renew your spirits, but you don’t want to see all the hard work from the school year transform a beautiful garden into a jungle of weeds. Here are a few ideas:
Choose low-maintenance plants to begin with. Focus on growing plants that will thrive on their own without much attention. Two characteristics to look for are drought tolerance and vigorous foliage that will smother or out-compete weeds. Choices vary by region and with the amount of rain or irrigation available to the garden. Check with your local Cooperative Extension Service office for a list of plants recommended for your area.
Use mulch. A thick layer of mulch reduces weed growth, maintains soil moisture, and enriches the soil as it decays. In vegetable and annual beds, use inexpensive organic mulch such as newspaper topped with straw. In perennial beds, add a 2- to 3-inch layer of more durable organic mulch, such as shredded bark.
Install irrigation. Drip irrigation equipment is available at most home improvement stores, and you can set it up to run on inexpensive timers.
Find volunteer help. Enlist the help of parent volunteers or service organizations such as FFA, 4-H, Scouts, and church youth groups. Create a schedule so that the grounds are checked regularly. Provide detailed care instructions. If your class has planted summer crops, you can offer the harvest to the volunteers as a reward. You may want to hold a work day one Saturday per month to knock down weeds or perform other large tasks.
Host a summer camp. Many schools offer summer school classes or children’s summer camps. Get in touch with teachers or summer camp counselors to see whether they are interested in taking advantage of your outdoor classroom facilities during the summer months in exchange for upkeep.
Harvest in the spring. Pick and use or distribute as much of the vegetable harvest as is ready. Pick flowers and press or dry them for art activities in the fall. Before leaving for the summer, remove all the plants and then do one of the following:
Cover it up. Cover the garden with a thick layer of mulch to discourage weeds and decrease water loss. The mulch will break down over the summer, providing organic matter and enriching the soil for next year’s crops.
Solarize. Solarization is accomplished by covering moist soil with clear plastic to use the sun’s energy to kill weeds and soil-dwelling pests.
Plant a summer cover crop. A cover crop, sometimes called green manure, is a short-lived legume (e.g., clover) or grain (e.g., wheat) that you plant to prevent weeds, reduce soil erosion, and boost organic matter. It also helps maintain or even increase the nitrogen content of the soil. The next fall, till the cover crop into the soil and plant the new garden.
Plant for fall. If there is not going to be much activity in the school garden during the summer, it might make sense to plant a garden in late May or early June that will be ready for harvest in the fall. Many vegetable varieties have varied “days to harvest” times. For example, some corn varieties take 70 days to harvest and others need close to 100 days. Choosing crop varieties with long “days to harvest” times, like winter squash, pumpkins, popcorn and other grains, soybeans, tomatoes, peppers, and eggplants will provide a bounty when you return to school.
Vandalism
There is nothing more discouraging to the students than to watch their garden become the victim of vandalism. After all the time and sweat poured into the garden, it is very frustrating to discover senseless damage. In addition to damage, sometimes a harvest is stolen, robbing students of the chance to taste the fruits of their labor. To decrease the incidence of vandalism:
Choose a site in a protected or highly visible location.
Post signs with information about the garden.
Create a mobile garden. Grow plants in containers with handles or wheels that can be moved out into the sun during the day, but secured indoors after school hours.
Involve neighbors in the project.
Identify potential vandals and involve them in the garden.
This content is from the California School Garden Network, a program of the Western Growers Foundation - www.csgn.org. Published with permission.

SCHOOL GARDEN PLANNING GUIDE
MENU


Compost bins at Redwood Cooperative in Lexington.
