
The Dirt on Soil
Objectives
Students will define ‘soil’ and learn soil components.
Students will distinguish uses and properties of different types of soil.
Students will describe the role soil plays in a healthy ecosystem.
STEAM Connections & Kentucky Academic Standards
NGSS
Life Science: Interdependent Relationships in Ecosystems - K-LS1-1, K-ESS2-2, K-ESS3-1, K-ESS3-3, 2-LS4-1, 3-LS4-3, 3-LS4-4, 5-LS2-1
Physical Science: Structure and Properties of Matter - 2-PS1-1
Earth Systems: Weather, Human Impacts, Natural Resources, Role of Water - K-PS3-1, K-ESS2-1, 1-ESS1-2, 4-ESS2-2, 4-ESS3-2, 5-ESS3-1
Math
Measurement and Data
Operations and Algebraic Thinking
Numbers and Operations - Fractions
ELA
Reading - Book connection (Dirt by Steve Tomecek)
Art
Perceive, develop, and complete artistic work
Background
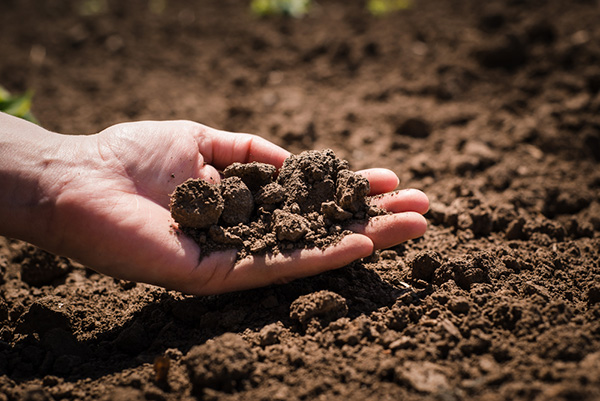
Soil is the foundation of food and other materials that help people live. The food we eat, the clothes we wear, and even the homes we live in, could not have been made without the help of soil.
Soil is formed from weathered rock, minerals, and organic matter (different living and dead plants, animals, bacteria, and fungi). Soil is the top level of the Earth’s layers and has developed over millions of years as bedrock is broken down by wind, water, and decomposing microorganisms. Soil is essential for growing plants. Soil is important for sustaining life on our planet for many reasons, such as being a medium for plant growth, filtering water and waste, providing a home to organisms (plants, fungi, worms and other invertebrates, and bacteria), and producing and absorbing gases.

The rock portion of soil is made up of different sized particles. Sand is the largest particle, and water drains through easily. Clay is made up of tiny particles that make it hard for water to flow through the soil. Silt particles are larger than clay but smaller than sand. These three types make up a soil’s texture and impact the soil’s ability to retain water, which determines how well plant types can grow in the soil.
Soil color tells about the soil’s mineral content. Soils high in iron are deep orange to reddish- to yellowish- brown. Soils high in organic matter are dark brown or black.
All soil particles have the ability to attract and hold water. The porosity of the soil (the available pore space of a soil type) determines how quickly water will move through the soil.
Soil Texture + Soil Structure = Soil Behavior
Introduction
Begin discussion by asking students, “What is soil?” The first answer will likely be, ‘dirt,’ so the next questions are: What is soil made of? What do you know about soil? and Why is soil important?
If you have the book, Dirt, now is a good time to begin reading it to the students—especially pages 4 – 15, which covers the information in our questions.
Discuss why soil is important to plants. It holds water, air, and nutrients that plants need to grow.
Ask, “What things can be found in soil?” then let students tell what they think based on what they already know.
Discuss how soils are a combination of sand, silt, clay and organic matter. Have a short discussion about what each of those terms actually mean.
Activity 1—What’s in Soil?
Materials
Soil samples (either collected by students around the schoolyard, brought from home or donated by local farmers or homeowners)
Trowels
Old newspaper
Hand Lenses
Craft sticks
Book - Dirt by Steve Tomecek
Procedures
If possible, take students outdoors with old newspapers, trowels, and hand lenses and let them dig up a small amount of soil and place it on a piece of newspaper. If not, bring in a few shovelfuls of soil from a place where there will be some organic matter present.
Working in teams or small groups, have students use the craft sticks to move the soil around and see what they can find. (Most classrooms will have a supply of small multi-purpose trays which are perfect for soil exploration.)
Have students record what they find. Students who cannot write the words can always draw pictures. There should be little bits of rock or sand, twigs, leaves, maybe worms, ants, beetles, or larvae along with the soil. The sample may also be moist, indicating the presence of water.
After putting the soil away, ask students to share what they found. Talk about the living, non-living, and once- living things they found. The teacher may want to record their findings to use again later.
Activity 2—Types of Soil
Materials
Pint or qt. jars with lids (at least 3)
Soil samples (either collected by students around the schoolyard, brought from home or donated by local farmers or homeowners)
Water
Procedures

Revisit the previous discussion about the types of soil: sand, clay and silt. Do the following exploration to demonstrate the types of soil.
Either bring in soil from a garden area or if possible, take students outside to get their own samples. Either way, work with students to fill up each jar with soil from three different areas. This works best if you dig about six to 12 inches into the soil before collecting it. If possible, sift the soil to at least remove vegetable matter, worm and other living things, and large rocks before filling the jars. Fill each jar about half full. Label the jars with the location from which the soil was gathered.
Add water to each of the jars until almost full (same amount to each). Put on the lids.
Have students shake the jars until all the clumps break apart.
Leave the jars to settle overnight.
When students return, they will notice that the soil will settle into different layers—as many as three (sand, silt, and clay). Larger pieces of organic matter may be floating on the top. Depending on the area in the garden or sample area, the different jars could look quite different. Ask them to use what they know about the different colors of soil to help them determine which kind of soil is in each layer.
Observe the soil layers throughout the unit on soil. Discuss with students how clay, sand, and silt allow water to flow differently through the soil, impacting different plants’ ability to grow.
Ask students which soil sample would likely grow plants best and why.
Explain that as impossible as it seems, sand is the biggest size particle of soil. It could be compared to a basketball. Silt is the next biggest size and could be compared to a baseball. Clay is the smallest particle and could be compared to a marble.
Have some of each type for students to touch. Ask them to describe the way each type of soil feels. This is called the soil texture. Soil texture depends on the amount of each size of particle in the soil. Sand will feel gritty; silt will feel soft, silky or like flour. Clay will feel sticky.
Click on the image for a printable file.
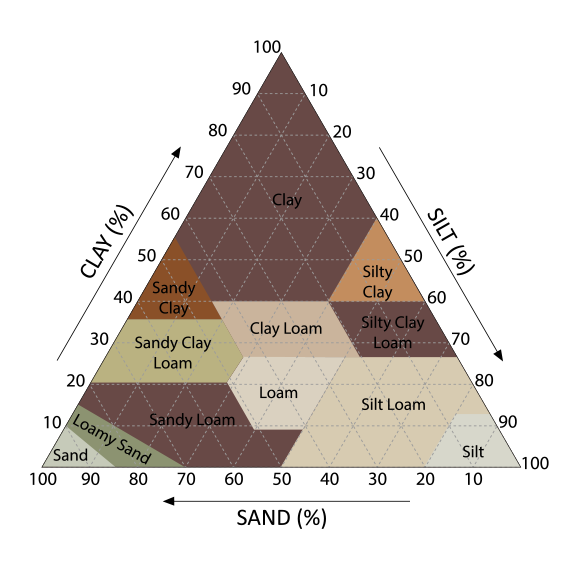
Math Connection for 5th Grade: Determining Soil Texture
Ask older students to measure the sand, silt, and clay layers in each of the jars to figure out the soil texture.
Measure the total height of the soil layers in the jar in millimeters.
Measure the height of the clay, silt, and sand layers, if they are present, and divide by the total height. They will then multiply each number times 100 to calculate the percentage of each soil particle layer.
If there are not three distinct layers, make a best guess as to which textures are represented in the layers presented. It is quite possible that a soil can be 100% clay, silt, or sand, or one of the three textures may be missing.
Once students have their percentages, use the texture chart above to determine the soil type.

Properties of Matter & Color Matching: Soil can be different colors, which may be affected by the material, it’s age, the minerals present, or climate. A dark brown or black soil may have a lot of organic matter. A red soil may contain rust (oxidized iron).
Select several paint swatch cards from your local hardware store that are similar to colors of soil. Provide several soil samples in clear containers and the color swatches and ask students to match the soil color to the swatch. Soil scientists use a similar test to describe soils for a given location and learn about the chemical processes in the soil.
Then ask which soils they believe will be best for growing plants, and which will be the worst based on color. Remember, darker soils tend to have more organic matter.
Curriculum Connection - Primary Plant Science
Soil investigation by preschool and kindergarten continue from this point with the understanding that plants grow in soil. It becomes a part of the lesson on what plants need to live. After exploring what is in soil, allow young students to investigate things growing in soil. If possible, take students outdoors to see what is growing in the schoolyard—flowers, grass, weeds, trees, bushes, and vegetables, if any are available. If it is not possible to take students outdoors for the exploration, bring in samples of plants growing as well as books.
Follow up soil exploration with planting seeds in soil. See What Do Plants Need to Live.
Activity 3—Soil Water Game
Procedures
Tell students that water moves through each of the different types of soil (sand, silt, clay) differently.
Ask students to stand. Divide the class into two groups. One will be soil, and the other will be water.
Tell the soil group that they will be sand particles—the largest type. They should stand arms length apart in the “game area.”
Tell the water droplets to move around and through the particles of sand to get to the other side of the area. Was it easy or difficult to move around the sand? Why? The larger particles are farther apart.
Next, tell the soil students they are particles of silt. Tell them to stand with elbows almost touching.
Tell the water droplets to move through and around the silt particles. Was it easier or harder than moving around the sand? Why? The particles of silt (or loam) are closer together and hold the water in the soil for a longer time.
Finally, tell soil students they are particles of clay. They need to stay pretty close together. Remind them that as water tries to move through, they should barely turn to let the water very slowly move through. Sometimes the water has to stop and go around a different way.
This was the most difficult kind of soil particles to move through. Why? The clay particles are very small and clump together making it very hard to water to get through. Clay-based soil may actually have water puddled on top for several days making it difficult for plants to survive.
Activity 4—How does Soil Type Impact Plant Growth?
Materials:
Three types of soil: sand, silt, clay
Small growing pots such as peat
pots or even milk cartons with drainage
Water
Procedures:
Provide containers of soil for this experiment: one will be primarily sand; one will be primarily clay; and one will be primarily silt/loam.
Having played the soil water game, students should have an idea of how soil type plays a role in plant growth and development. Revisit and review this concept before beginning the activity. Ask students to draw a sketch of the three labeled cups then write at the top of a journal page or recording page what their predictions are for growing beans in each type of soil.
Working in small groups, ask students to fill one container with sandy soil and label it. Next, fill a container with clay soil and label it. Last, fill a container will silt/loam soil and label it.
Be sure to provide materials for at least three containers of each kind of soil. The containers do not need to be large. Explain to students that it is a good idea to plant more than one seed in case one or more of the seeds just do not germinate.
Provide bean or pea seeds for students to plant in each pot. Two or three seeds per pot is recommended.
Put water in the measuring cup, noting how much water they start with, and let students add water until the soil is saturated. Have them note how much water they added and record that amount on their recording page.
Place the cups in a sunny location or under a grow light.
Each day, check the moisture level of the plants by carefully pushing one finger gently into the soil. (Small containers often dry out pretty fast so it’s a good idea to check on a regular basis.)
Have students note which of the pots is still very wet, very dry or moist. Ask why they think that is and have them share their thoughts.
When watering, add the same amount to each pot.
Continue this process until a sprout comes up. This usually only takes a few days with beans or peas. Students record the day a sprout is seen and continue to record growth in their journals.
Students may note that some of the pots do not have any sprouts; some have sprouts that shrivel up and do not grow; or sprouts that grow to several inches.
Ask students to share their thoughts on what is happening.
Discuss the importance of choosing the right plants for the right soils. Have students research plants that grow best in each type of soil.
In the journals, ask students to record their findings and draw sketches of their experiment results.
The sprouts that are growing can be transplanted into larger containers or into a garden space outside (depending on time of year and soil temperature).
Activity 5—How Does Soil Temperature Impact Plant Growth?
Materials:
Soil or Meat Thermometers
Thin skewers marked at 2, 4, and 6 inches (pencils will work just as well)
Clipboards, Soil Temperature Data Sheet, pencils for recording
Vocabulary:
Weather: the condition of the atmosphere (air around us) at a place and time such as hot, cold, windy, cloudy, wet.
Meteorology: the study of weather. Meteorologists study air, wind, and rain to forecast weather.
Thermometer: An instrument used to measure temperature. Heat causes liquid inside to expand and climb up the tube.
Introduction:
Ask students what they know about weather in each of the seasons. Ask what months are hot, cold, warm, cool, snowy or rainy. Use a computer to find the average temperatures in the winter, summer, spring and fall in your area. Put these numbers on the board and ask students to add descriptive words to the temperatures such as cold, hot, warm, cool.
Explain that soil temperatures change in the seasons, the same way air temperatures do. Ask how they think farmers and gardeners use soil temperature to help them know when to plant?
Share the following chart and activity with students.
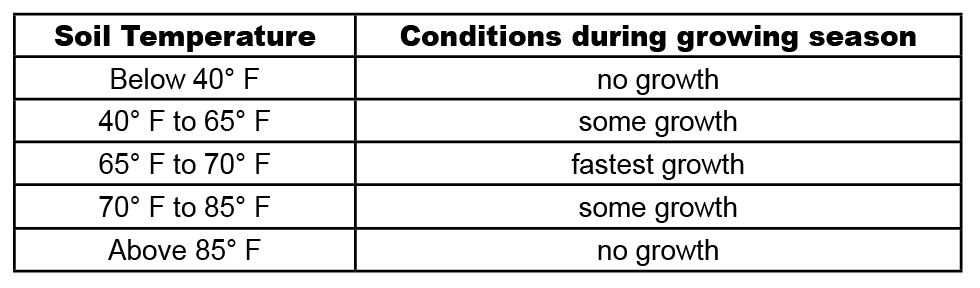
Click the image for a printable version.
Farmers and gardeners use a chart like the one above to determine when the best time to plant specific plants will be.
Procedures:
Take students outdoors (to a garden if available) to demonstrate how to measure soil temperature. A lesson on using a thermometer can be found here - How to Use a Thermometer. Make sure they also have their clipboards, pencils, and the Soil Temperature Data Sheet.
First, measure air temperature. Using a thermometer measure the air temperature at shoulder height. Measure the temperature at the surface of the ground. Is there a difference?
To measure the soil temperature, use the skewer or pencil that is marked at 2, 4 and 6 inches. Push the skewer into the ground to the 2 inch mark. Remove the skewer and place the thermometer into the hole and keep it there for one full minute. (Teacher may need to use a stop watch and call out start and stop.)
Remove the thermometer and record the temperature. Repeat the procedure for 4 inches and 6 inches.
Back in the classroom, compare the temperature readings and different depths and ask students to compare their readings to those on the farmer’s chart for planting. Have a discussion about what they learned about the soil temperature and its impact on growing plants.
Digging Deeper:
Does the sun affect soil temperature? - To determine how direct sunlight affects soil temperature have students measure soil temperature in an area that gets full sun (near a brick or concrete wall is a good spot) and then in an area that is in full shade.
Students may measure air temperature as well in those areas.
Discuss the results of their measurements and ask how they think these temperatures will impact plants in those areas.
Math Extension:
Students discovered that soil temperatures change with soil depth. Ask students to compare the temperature they recorded at different depths. At which depth is the soil warmest? Coolest? Have students subtract the difference in temperature from warmest to coolest.