
Pumpkin STEAM Activities
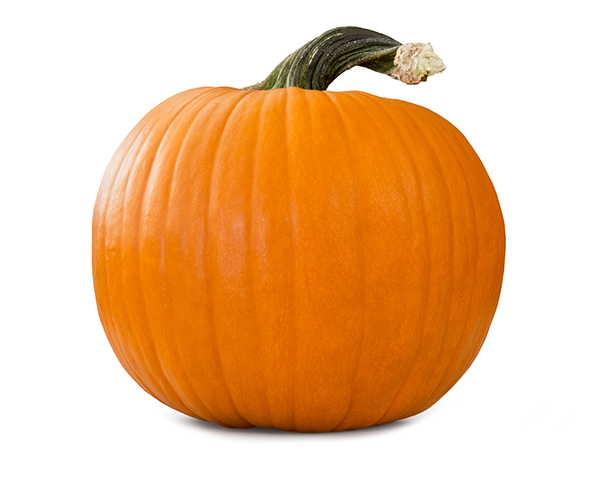
Pumpkins are just interesting to all ages. To create an atmosphere of inquiry in a classroom, just bring in a pumpkin and set it on a table. Students will want to touch it and pick it up. They will begin to ask questions which turn into real life investigations. Without even trying, the teacher has introduced a cross curricular learning experience across grade levels.
STEAM Connections & Kentucky Academic Standards
NGSS
Life Sciences - Growth and Development of Organisms, Structure and Function - 1-LS1-1, 4-LS1-1
Math
Measurement and Data
Technology
Using tools to measure.
ELA
Reading - Book Connections
Writing a Narrative
Kindergarten and First Grade
Estimated Time: 60 minutes
Materials:
Pumpkins of different sizes
String
Scissors
Unifix cubes or a measuring tape
Scale
Procedures:
The teacher may choose to do this as a whole class activity with participation from each student or if possible, in small groups with one pumpkin and one adult per group. I like to have the children sitting on the floor with a table at the front so everyone can see.
Introduce one or more pumpkins to the class. It is helpful to have a discovery table where pumpkins of different sizes can be explored by students on their own.
A good way to begin the lesson is to tell them they are going to learn about the pumpkin by doing investigations together. Show them some of the tools they will be using. If you have not already taught the word estimate and real or actual, do so:
Estimate - to find a value that is close enough to the right answer.
Real or actual - the exact value that is found through measurement or calculation.
On the chart paper, use one color and write ‘Estimate.’ With the other color, write ‘Actual.’
Begin with asking how big around they think the pumpkin is. Hopefully this is not their first introduction to measurement, but if it is, just explain that it is like measuring them for a belt that goes around their waist. If you are working with a large group, let three students give you their estimate and record on the chart.
Choose two children to do the measurement. One child holds the string while the other takes it around the biggest part of the pumpkin. Cut the string when they get it around.
Have another two children come up and hold one end of the string at the beginning of the measuring tape and the other stretch it along the tape to where it stops. Ask the child what the number is where the string stopped. They may need teacher help. Record the number of inches around the pumpkin actually is in the Real column.
Repeat the process with different children for the height of the pumpkin. Estimate, then measure and record.
Next, let the children pass the pumpkin around to see how heavy they think it is.
After everyone has picked the pumpkin up, ask how much they think it weighs. Again, if it is a large group, choose three estimates to record but let each child tell how much they think it weighs.
Choose two more children. One to put the pumpkin on the scale and another to read the number. If you do not have a scale that will weigh several pounds, weigh the child first without the pumpkin and again with the pumpkin. For younger children, the teacher will need to do the math and tell the children the actual weight. Record.
Next, ask the class if they thought the pumpkin was heavy or light when they were passing it around. Then ask if they think it will sink or float if they put it in water.
If you have time, set up a screen with the container of water hidden from the class. Let pairs of children tell their guess then go behind the screen and do the float/sink test. They keep the results secret until everyone has had a turn. (This will get lots of giggles.) At the end, ask if the pumpkin floated or sank. Everyone can shout their answer. It floated! Now, the question is WHY? Ask for possible reasons.
Next, tell students they will do an investigation to find out more about the pumpkin along with why it floated. Cut the top off the pumpkin and let everyone look inside. Let them see that while there are seeds and pulp in the pumpkin it is mostly hollow, like a ball.
Ask children how many seeds they think are in their pumpkin. Let everyone tell their estimate but select three randomly to record.
Give each student a paper plate and a paper towel. If they want, let them reach into the pumpkin and pull out a big handful of seeds. Some will love this, some will not. You can put a handful of seeds on their plates.
Explain that we are going to count the seeds and record how many there really are in the pumpkin. Children may work in pairs and help each other. Ask children to put their seeds into groups of ten.
When they are telling how many seeds they have, you may need to assist in the counting. Record on the chart how many seeds each group found. Add the numbers and record the total number of seeds.
While children are washing their hands, collect the seeds to wash and roast later.
Pull the class back in and read one of the excellent books about pumpkins. See the list to the right.
Ask students what their favorite ways are to eat pumpkins and record them on the chart. (See the recipe for making pumpkin pie in a bag.) You will want some extra help with this, but it is a fun way to celebrate pumpkins.
I always take the seeds home and roast them. Everyone may sample the seeds the next day, if they wish.
A good extension is to have a pumpkin party and invite parents to send in a sampling of their favorite pumpkin dishes. Ex: pumpkin muffins, cookies, tarts, and so on. Be sure to follow the homemade treat policy.
A literacy extension is to make a pumpkin journal. A reproducible sample is included at kyreadysetgrow.org. Students in lower levels may do two or three pages while other students may complete the life cycle page as well as create more of their own.
Students may want to make faces on paper pumpkins that show different emotions. These could be displayed on a wall with crepe paper vines and leaves.
If there is a good place outside, fill a pumpkin with soil (leave the seeds inside), add some water and just leave it there. IF animals don’t eat it all, there will be a pumpkin plant growing there in the spring!
Additional Investigations for Grades 2-3
There are creases that run side by side (stem to bottom on the outside of a pumpkin). Are their more creases on bigger pumpkins than on a smaller one?
Is there something on the inside of the pumpkin that lines up with the creases on the outside?
Do pumpkins with more creases have more seeds?
By looking at a pumpkin can you tell which side was on the ground?
Are pumpkins mostly full or mostly empty?
Are the seeds scattered around inside a pumpkin or are they arranged in certain groups and patterns?
Think of a way of finding the number of seeds in a pumpkin without actually counting each seed. A pumpkin was once part of a beautiful yellow flower. Find the place on the pumpkin where the blossom part of the flower grew.
Additional Investigations for Grades 4-5
Estimated Time: 60 minutes
Materials:
Disposable plastic tablecloths
Strainer
Disposable bowls
Paper towels
Measuring tapes
String or yarn
Rulers
Body weight scale
Procedures
Use a pumpkin project to teach estimation, measurement, place value, and other math concepts. This lesson melds standards-based content with slimy, tactile teamwork, making it the perfect October (or November) activity.
Bring the first pumpkin in to school to set the stage for the project. Try to find an unusual one, misshapen or oddly colored. If possible, collect one pumpkin for every three to four students. This ratio allows all of the children to really get their hands into a pumpkin while preserving the group-work element.
Students will experiment with how to best measure the circumference of their pumpkins. Provide measuring tapes, yarn, and rulers. To weigh the pumpkins, students stand on a scale holding their pumpkins, and then subtract the students’ weights to determine the pumpkins’ weights.
It is important to demonstrate how to count the creases on a pumpkin. Creases are the vertical lines on the pumpkin, and we count each crease from the “South Pole” to the “North Pole.” Students make a pen mark on the first crease they count so that they do not over-count the creases.
Encourage students to wear old clothes and an apron, and cover every possible surface in plastic tablecloths or cut-up garbage bags; this phase of the project is inevitably messy in the very best of ways! The teacher should cut open the top of the pumpkins before the students arrive. Students are instructed to lift the top off their pumpkin and separate the “guts” into two piles—pulp and seeds.
After the students separate their seeds and rinse them in a colander, I clear away the pumpkins to a side table. Students then begin the challenging task of accurately counting their pumpkin seeds. (This can be done in a follow-up lesson if necessary.)
Each group is asked to come up with a reasonable estimate without counting all of their seeds. Students have time to ponder how best to make their estimates. Some groups may choose to weigh their seeds, then weigh a subset, count the number of seeds in the subset, and then multiply by the appropriate ratio. Other groups may choose to divide the seeds up by volume and then count a smaller volume of seeds.
Each group must present their estimate and their method to the class before counting their total number of seeds. When counting the seeds, the students devise their own methods to keep track of the seeds they count. Some group their seeds, others record their running totals on paper. Finally, the students compare their total with their estimate and analyze the difference.
This project suggests so many math extensions—pumpkin seed arrays, word problems, graphing, and more. Don’t forget to return to the original investigation question. Were the students’ original predictions accurate? Why or why not? Which measurement was the best predictor of the number of seeds?
You may want to finish reading aloud How Many Seeds in a Pumpkin and compare your students’ results with the results in the book.

Reading Connections
The Pumpkin Book
By Gail Gibbons
Seed, Sprout, Pumpkin, Pie
By Jill Esbaum
From Seed to Pumpkin
By Wendy Pfeffer
Pumpkin Jack
By Will Hubbell
Too Many Pumpkins
By Linda White
Pick a Perfect Pumpkin
By Robin Koontz
Pumpkin Circle, Story of a Garden
By George Levenson
How Many Seeds in a Pumpkin
By Margaret McNamara
Margaret McNamara has written the perfect book to introduce the pumpkin seed investigation. In How Many Seeds in a Pumpkin, Charlie’s class attempts to answer this very question. Charlie, the smallest child in class, also has the smallest pumpkin. To everyone’s great surprise, Charlie’s pumpkin has the most seeds.
As you read the book, make sure to stop reading before you get to the page where the students share their pumpkin seed counts because your students will be doing their own pumpkin seed investigation.

PUMPKIN WRITING
Tell the story of how a pumpkin grows: first you plant the pumpkin seed, then it sprouts. You must have water and sun for it to grow. The vines grow bigger; a flower grows. A small green pumpkin grows from the flower, and it slowly turns orange. It grows bigger and bigger, and finally it is time to pick it. From the pumpkin you can make a Jack-O-Lantern or a pumpkin pie. Kids can illustrate the story and label the different parts of the pumpkin (vine, stem, seeds, skin, meat, pulp, ribs, leaves).
![pumpkin pie [Converted].png](https://images.squarespace-cdn.com/content/v1/5cdecce138275f0001d2fd9b/1568043357258-JZCERDJ87G7Q0ITZ8NND/pumpkin+pie+%5BConverted%5D.png)
PUMPKIN Pie in a Bag
Ingredients:
1 1/3 c. cold milk
2 4-oz. boxes of instant vanilla pudding
1 15-oz. can of pumpkin
1 tsp. cinnamon
1/2 tsp. ginger
1 box of graham crackers
1 can of whipped cream
Materials:
1-gallon size zip-top bag for graham crackers
1-quart size zip-top bag for pudding mix. You may need several if you multiply the recipe.
8-oz paper or plastic cups—enough for each child
Put graham crackers in a heavy duty zip-top bag and crush them with a rolling pin or meat tenderizer.
Have each child scoop 2 Tbsp. of graham crackers into a small cup.
Pour milk and pudding mix into another bag and remove the air. Have the children squeeze and knead the bag (each getting a turn). Add the can of pumpkin, cinnamon, and ginger. Remove the air; reseal and knead some more.
Snip the corner off the bag and squeeze some into each cup of crackers. Put a dollop of whipped cream on top.
Serves about 10.